SecurityTronix Walkthrough Guide:

Your source for video surveillance tech tips that will help your business become more efficient!

Power over Coaxial (PoC)

Introduction

For some time, coaxial cameras have been reliant on bulky power supplies and the need to install extra cables. This can lead to expensive and cluttered installations. In some cases, installers may find themselves working within budget constraints or set with the task of modernizing an older existing analog system with a coaxial infrastructure. It is in instances like this where SecurityTronix has you covered! 

SecurityTronix would like to proudly introduce, Power over Coaxial (PoC) DVRs & Cameras! This technology sends power from the BNC ports on the back DVR to the cameras right through the coaxial cable. This new technology eliminates the need for power to be supplied via a second cable or for the technician to find local power on most runs. This tech bulletin will go into some of the specs and configuration that the PoC devices require.

PoC Cameras:

With reference to PoE standards, the manufacture has introduced AT and AF mode for PoC to distinguish the power level of PoC cameras:

AT/AF Mode:

The operating power of an AT camera is around:  7.5W – 9.5W, with AF cameras operating around: 4.8W – 6.8W. These two modes are not related to IEEE 802.3 IP standard. 

The operation power may vary depending on camera type/style. For instance, some AT cameras max out around 12W and some AF cameras max out around 6W of power consumption.

See below for a chart that further explains the operation power of AT / AF cameras.

PoC access capability:

PoC Device

Allowed AT/AF Camera Access

4-ch PoC device (About 40W Consumption)

4 AT cameras

8-ch PoC device (About 60W Consumption)

8 AT cameras

16-ch PoC device (About 140W Consumption)

8 AT cameras + 8 AF cameras
(Or up to 12 AT cameras)

The table below shows the various combinations of AT and AF cameras that a 16-ch PoC device can support:

AT camera access

12

11

10

9

8

N (0 to 7)

AF camera access

0

2

4

6

8

16-N

Cable and transmission distance:

The allotted transmission distance varies with different cable types and PoC camera models. PoC transmissions also work with video baluns when converting to and from UTP cable.

2MP

4MP

PoC.AF

PoC.AT

PoC.AF

PoC.AT

RG6

300m/1000ft

200m/675ft

150m/500ft

150m/500ft

RG59

200m/675ft

100m/350ft

150m/500ft

100m/350ft

CAT5E (UTP)

100m/350ft

50m/175ft

75m/250ft

50m/175ft

PoC Recorder:

These recorders can detect the connected PoC cameras automatically, manage the power
consumption via the coaxial communication, and provide power to the cameras via coaxial cable.

Before you start

  • Ensure your device supports PoC camera connections.
  • Connect the PoC camera to the DVR.

Configuration:

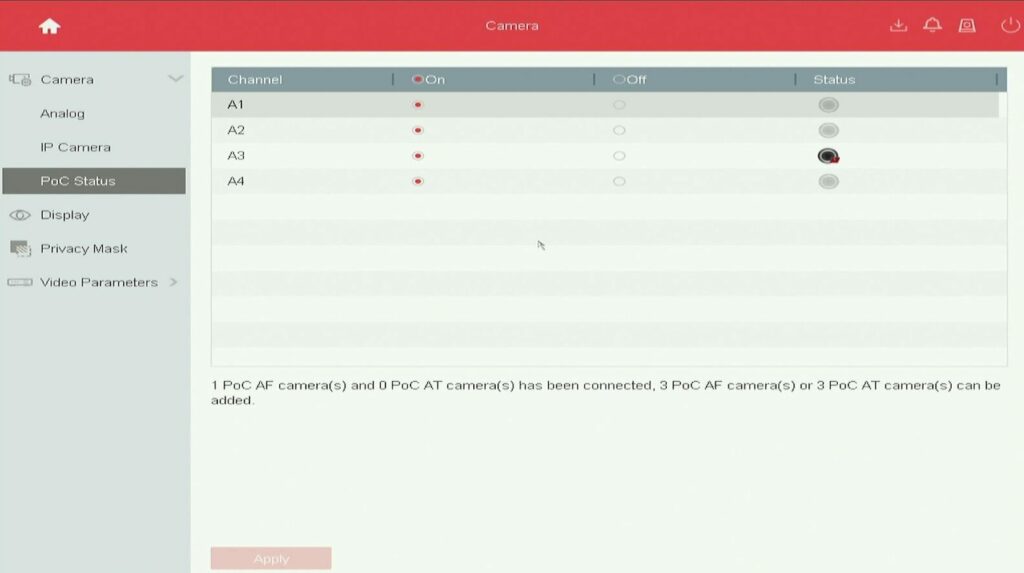
  1. Go to Menu > Camera > PoC Status.
  2. Turn on the PoC for each of the channels(s) to which the PoC cameras are connected.
    • Only specified PoC cameras are supported by the PoC features of these recorders.
  3. Check the status of connected PoC camera(s).
  4. Check the amount of AF or AT cameras you have connected and ensure you are within the allotted power draw for the cameras.

The image below displays the channels and PoC status for each channel. It shows the amount/type of PoC cameras added, as well as the amount/type of PoC cameras that can be added.

This concludes the Power over Coaxial walk through guide. We hope you have found this informative and helpful towards your current and future installations. If you have any further questions on specs or operability, please do not hesitate to reach out to our tech team! If you have any questions about any SecurityTronix product, please don’t hesitate to contact us:

SecurityTronix Support Line: (610) 429-0334

SecurityTronix After Hours Line: (702) 308-4220

SecurityTronix Support Email: Support@SecurityTronix.com